
After making the decision to partner with King Energy on a rooftop commercial solar program, you may be wondering what happens next. When will your property start capturing and distributing solar energy to your tenants?
After signing your lease with King Energy, it takes approximately 9 months to complete the project, and only 4-8 weeks will involve the installation of the solar program. The bulk of the overall timeline will be occupied by system design and obtaining approvals–both from the utility and permitting authorities. For installation and construction, we partner with experienced EPC (Engineering, Procurement, and Construction) contractors to skillfully complete each program. King Energy and our partners take care of all of these steps, and minimal effort or involvement is required from property ownership or property management.
Now, let’s dive into an outline of what to expect from the process:
Step 1: Land Review
Step 2: System Design
Step 3: Utility Interconnection Application
Step 4: Permit Submission
Step 5: Financing is Finalized
Step 6: Notice to Proceed
Step 7: System Installation
Step 8: AHJ and Utility Inspection
Step 9: Permission to Operate
Step 10: Program Go-Live
Step 1: Land Review
Prior to every commercial solar project, King Energy will generate an Assessor’s Parcel Number (APN) map. This process is conducted internally for the initial phase of the project, and it will be required again for utility interconnection.
The APN map we provide shows all the parcels of land in a large block, and highlights which parcels are owned by the same entity, as well as the meters from which we are planning to offset power. This highlighted APN map, along with a satellite imagery mockup, is then provided to the utility in conjunction with our preliminary system design for approval.
The land review is an essential part of the utility process and it allows us to ensure that all parcels are owned by the same entity. Tenants operating within parcels owned by the same entity qualify to participate in the energy savings program after go-live. Any parcels owned by other entities can be grouped into a separate program. Once we have verified that everything looks good, we can finalize the scope of the project and move into system design.
Step 2: System design
Based on our findings from our internal land review as well as our assessment of tenant energy needs, we develop a preliminary design to confirm the scope of the project. We generate a mockup of the proposed system and a single-line diagram that shows the system in a schematic form for utility review. We are now ready to apply this to the utility interconnection application.
System design is an ongoing process that takes the APN map and satellite imagery mockup and builds out a detailed design needed to obtain the necessary permits and start construction. This can be a months-long, evolving process.

Single line diagram of proposed system (top), assessor’s map (bottom)
Step 3: Utility interconnection application
In this phase, the utility company reviews all of the technical aspects of the project, checking the application for accuracy and completion. The application includes the preliminary design documentation drawn up during our initial land review and design processes, along with information on how we are physically interconnecting the system, details on the key components, and an initial indication of allocations to tenants.
Several important factors of the property will be assessed, including the amount of power being put back onto the grid through their local facility (transformer), the immediate distribution network around the facility, and whether the grid can accommodate the project from an energy standpoint. Depending on what they find, they may continue to review the immediate distribution network and substation.
In general, this process takes 5-6 weeks to complete. Once all the technicalities check out, we’re ready to proceed with the next phase.
Step 4: Permit submission
In the permitting stage, we continue to work on the design set, which incorporates the structural aspects of the roof. After the initial review of the roof and further system design, we will submit for a permit with the Authority Having Jurisdiction (AHJ) and pay the relevant fees. We may perform this step in parallel to the interconnection application.
The AHJ (typically the local county or city) will provide commentary which we address to finalize the permit. This phase is conducted entirely by King Energy and rarely requires form execution from the property owner. Generally, this can be completed within 4-10 weeks.
Step 5: Financing is finalized
Before getting into the meat of the project, we formally submit the program to our financing partners, so you as the property owner have no out-of-pocket costs. Each King Energy project is designed from the onset to comply with the financing expectations of our partners, so finalizing financing involves confirming the size, specifications, and tenant energy usage levels.
Once the financing process is formalized, purchases of project infrastructure can be executed allowing the delivery of program materials to the project site.
Step 6: Notice to proceed
One of the most exciting steps in the process, the Notice to Proceed (NTP), is granted by King Energy, usually when we have the utility’s initial review complete and have received permit approval. This is our green light for the EPC partner to move forward with construction.
At this stage, all of the construction materials are delivered to the site, and construction commences. Typically, construction for a commercial rooftop solar project takes 4 to 8 weeks depending on the size. Tenants in the building can continue operating their businesses uninterrupted during this time.
Step 7: System installation
While there are many moving parts to this step, a general outline of what to expect during this stage is as follows:
Loading materials on the roof:
Before installing the system, we begin by loading items onto the roof.
A typical neighborhood center is small enough to use a standard reach lift, but we may coordinate a crane when needed. We coordinate with property management to minimize any disruption to the tenants.
Laying out the racking:
In order to provide protection for the roof, we use slip sheets of appropriate roofing material under every contact point between the racking and the roof. We install the weight that holds the racking down. Then we mark, install, and seal any roof attachments that may be required.
Installing the solar modules:
Installation of the solar modules can begin alongside the laying out of the racking. They are mounted to the racking, and the wires are managed in a way that prevents them from contacting the roof while being secured cleanly under the panels.
Timelapse module install of Sherwood King Energy program, August 2022.
Connecting electrical and installing electrical room equipment:
A bundle of wires, called home runs, are carried back from the modules and connected to the inverters. Conduit and wire is installed from the inverters to a breaker panel, and then from the breaker panel to the electrical room. Finally, the electrical room equipment is installed.
This includes:
- A disconnect switch that forms the emergency shutoff point for the system.
- A transformer (if required by switchgear configuration).
- A Net Generation Output Meter (NGOM) to monitor production.
Timelapse wire install of Sagepointe King Energy program, February 2022.
Tying to the grid:
Finally, a tap is performed in the existing service gear. This is where we physically tie into the grid and piggyback off what already exists.
This is the only part of the process that requires a disruption of power typically lasting 4-6 hours. Generally, only tenants whose meters are in that specific switchgear are affected during the tap.
We typically conduct this in the middle of the night at King Energy’s expense.
Significant detail-oriented oversight from King Energy team members is required throughout system installation. Inspections provide quality assurance for both King Energy and the property owners.
Step 8: AHJ and utility inspection
Once construction has been completed, we coordinate with the utility company and local building authorities again.
First, we work with the utility company to inspect the project and set the meter. Next, the AHJ inspects the work. Significant detail-oriented oversight from King Energy team members is required during these steps. The inspections also act as quality assurance for the property owners.
Step 9: Permission to operate
Once all of these inspections have been finalized, there is a 2 to 3 week wait before we receive Permission to Operate from the utility. This final utility inspection is the last step before we can energize the system and go live.
Now, your system is officially ready to start producing clean energy for your tenants.
Step 10: Program go-live
We are now ready for your commercial solar program to go live and start generating clean, sustainable energy. At program go-live, we start to gather data and make sure the monitoring system is operating correctly, and provide troubleshooting, as needed, to make sure everything is running without a hitch. With that, you and your tenants are ready to enjoy all the benefits of your new rooftop solar program.
Tenants start saving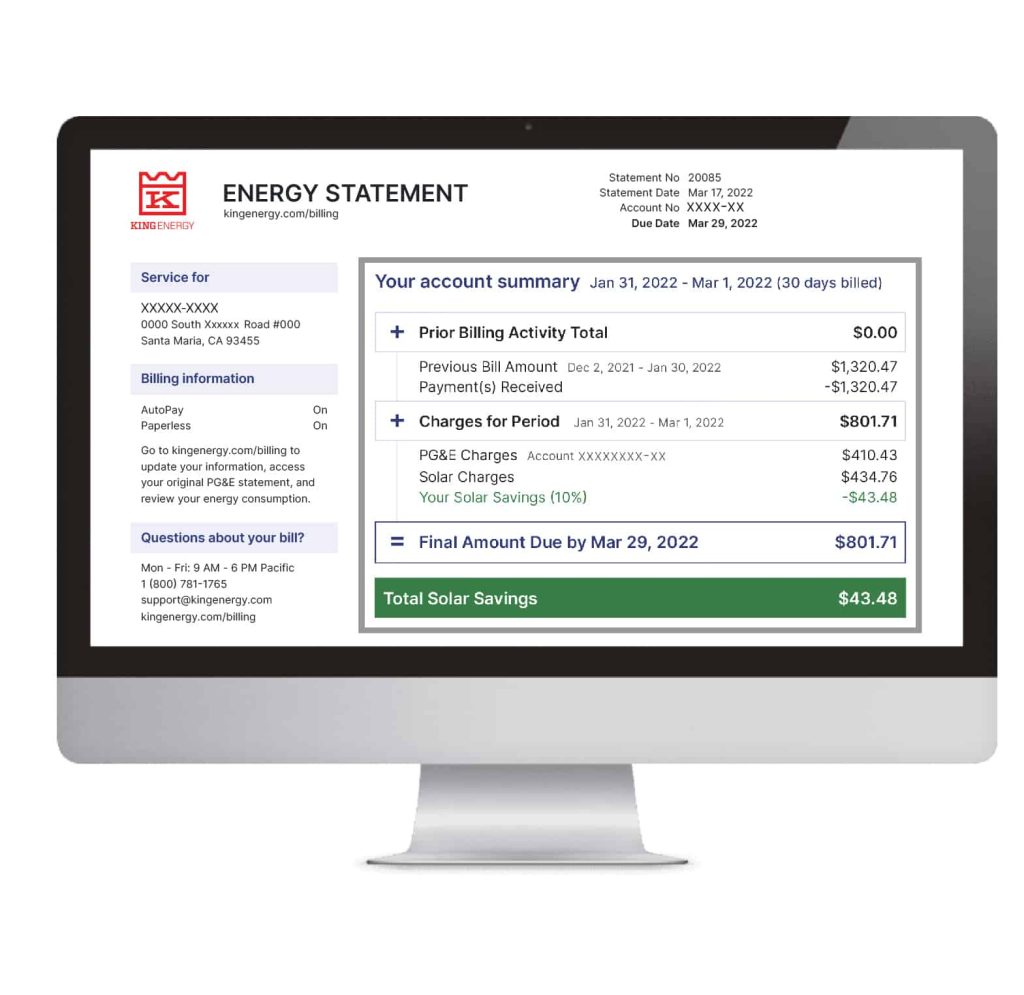
During the installation of a solar program on a commercial property, our tenant experience team walks each tenant through the simple online opt-in process. This pain-free task generally takes less than five minutes.
Once onboarded, tenants conveniently receive a single monthly bill through King Energy’s OneBill™ statement. This combines our solar energy bill and the utility’s energy bill in one easy-to-read statement. One bill and one payment enables tenants to feel organized and stay on top of making payments.
We provide tenants with several choices: paper and paperless billing as well as manual and autopay options. All tenants have access to both their utility bill and solar bill in one easy-to-use interface. In short, the OneBill™ experience is more convenient than the traditional utility experience.
Curious about operating a commercial solar program on your building rooftop?
Now that you know the ins and outs of setting up a commercial solar program, it is worth noting again that King Energy handles the full process with minimal intervention from the property owner. We are here to answer any burning questions you may still have. Reach out to a King Energy representative to discuss how our rooftop solar programs can provide you with clean energy and additional income.